Thoracentesis
INDICATIONS
Diagnostic: To aid in diagnosis of a pleural effusion. Effusions should be at least 10 mm in width on a lateral decubitus chest x-ray or have >1cm of parieto-visceral distance on ultrasound during inspiration and expiration. If loculated or less than 10 mm, ultrasound or CT guidance should be utilized. Previously untapped effusions from certain causes (e.g., CHF) may be left alone if the patient is responding to treatment.
Therapeutic: To relieve symptoms (usually dyspnea) from an effusion of known or unknown cause.
CONTRAINDICATIONS
- Skin infection or zoster overlying area to be needled.
- Severe Coagulopathy (platelets <50 K or INR significantly over 1.5) ***if ribs are easily palpable, INR into the 1.7-2 range may be acceptable for procedure.
- When chest tube more appropriate (e.g., need for sclerotherapy)
- Very small effusions or loculated effusions should be done under ultrasound guidance.
PREP & ANESTHESIA
- Explain the procedure and obtain informed consent.
- Position patient sitting on side of bed with arms up on side table.
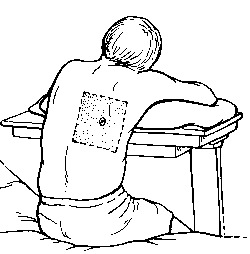
- Using indirect percussion or auscultatory percussion, note the level of dullness.
- Plan to enter the pleural space about one intercostal space below this level, just above the rib. This will avoid hitting the neurovascular bundle.
- Make a mark with a retracted pen in the skin
- Cleanse the area with povidone-iodine solution.
- Using the 25 ga (blue) needle, make a wheel in the skin at this spot.
- Use the 22 ga (green) needle to enter the skin at this spot. Advance a small amount, aiming for the superior portion of the rib. Stop advancing periodically as you go, pull back slightly on the syringe, and inject a small amount of lidocaine. When you hit the rib, inject, retract slightly, and aim towards the top of the rib, each time injecting so you anesthetize the sensitive periostium. You will try and enter the pleural space just above the rib.
- When you hit the pleura, you may feel a pop or just obtain fluid. Inject some lidocaine just as you enter the pleural space, and also as you back out the needle. Also note of how far the needle goes in to guide you when you use the thoracentesis needle.
TECHNIQUE
- Make a small incision with the scalpel at the chosen site to facilitate entry of the needle through the skin.
- Attach the small anesthetic syringe to the thoracentesis needle and enter the skin. Pull back on the syringe as you advance, and when you enter the pleural space, stop advancing.
- While holding the syringe and needle, advance the plastic cannula covering the needle a few cm.
- Remove the needle from the cannula, holding a finger on the cannula opening to prevent air from entering.
- Attatch the large syrine and aspirate fluid from the catheter in the pleural space.
- Place fluid into collection tubes if indicated for analysis.
- If fluid is to be sent for cytology, use plastic bag in kit. Use one-way valve and 60 mL syringe as a pump to fill bag with desired amount. It is best to obtain as much fluid as possible for cytology. Note: Lab will not accept glass vacuum bottles for specimens. An alternative is to fill an additional 60cc syringe for cytology
- If vacuum bottle to be used, close clip on tubing, attach tubing to into bottle, and then attach to catheter so the system is closed at all times.
- Maximum amount removed should be no greater than about 1500 mL tap.
- Alternatively, if someone begins to develop chest pain during the procedure it should be stopped. The presence of cough is not unusual and should not terminate the procedure. If the patient develops ipsilateral shoulder pain, the catheter is likely tickling the diaphragm, and should be pulled back.
- When done collecting fluid, remove needle, and placed bandage over site.
- Obtain post-procedure chest x-ray and write procedure note.