Femoral Central Venous Catheter
INDICATIONS
- Central venous access for infusion of vasoactive drugs, TPN, high dose KCl, etc.
- Hemorrhagic disorder where large volumes blood/blood products needed
- Measurement of central venous pressure
- Need for frequent blood draws where peripheral access limited.
- Lack of peripheral venous access
CONTRAINDICATIONS
- Severe coagulopathy; INR > 1.5-1.6; platelets < 50 K (relative contraindications). The femoral or IJ site is preferred with a coagulopathy or anticoagulation due to the ability to compress the vein in the event of serious hemorrhage.
- Infected skin site
- In patients with higher risks for pneumothorax or inability to tolerate pneumothorax, the IJ or femoral sites may also be preferred.
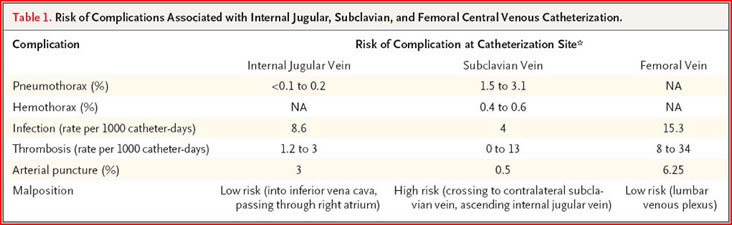
RISKS
The risk of complications of central line placement varies with the experience of the operator and the conditions (emergency vs. elective) under which the line is placed. Nonetheless, some general statements can be made and used when obtaining consent from a patient.
n engl j med 356;21 www.nejm.org may 24, 2007
INDWELLING CENTRAL VENOUS CATHETER REMOVAL GUIDELINES
- No specific time interval for changing or removal. Catheter site and need should be reassessed daily. If site becomes infected, removal and if needed, replace at a different site.
- If line is to be removed because of suspicion of a catheter-related infection, and the skin site is not infected-looking, guide wire exchange with blood cultures through the line and culture of the tip should be performed
- Catheter removal may not be required with coagulase-negative Staph line infection without infected skin site, but most other catheter related infections require removal and antibiotics.
TECHNIQUE
- Cleanse an area approx 15-20 cm below inguinal ligament
- Drape with drape provided in kit.
- The site to choose should be 1-2 cm below the inguinal crease, about 1cm medial to the femoral pulse.
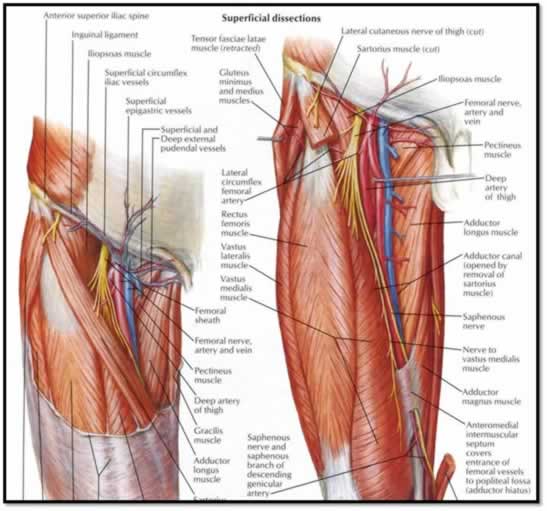
- Be sure to enter below the inguinal crease to avoid retroperitoneal puncture.
- Using the blue 25 ga needle anesthetize the skin with lidocaine, and then the subcutaneous tissues with the green 22 ga needle.
- Using a 30-45 degree angle, bevel up, enter the skin with the 18 gauge finder needle attached to the skin.
- Using the finder needle (largest needle in the kit) and a small syringe, enter the skin, aiming towards the sternal notch, always pulling back gently on the syringe.
- When you see a flash and easy withdrawal of dark blood, this indicates entrance into the vein.
- If you bury the needle without blood, gradually withdraw; you may still get into the vein.
- Once in the vein, steady the needle and remove the syringe, holding a thumb over it to prevent air embolism.
- Insert j-tipped guide wire into needle; if resistance is felt do not force it.
- Generally 10-12 cm of guide wire should be placed beneath the skin to ensure entry into the vein.
- Holding guide wire, remove needle from skin.
- Make a small nick with the number 11 blade where wire enters skin to accommodate dilator.
- Advance dilator over guide wire with a twisting motion; there will be resistance.
- Remove dilator, holding guide wire
- Place catheter over guide wire; it should advance easily. Hold guide wire at skin entrance and feed it back through distal port of central line. When wire comes out, hold it at the end and finish advancing catheter.
- Remove guide wire and flush line.
- Suture catheter in place via flange with holes. If more than a cm or 2 of catheter is exposed due to length, either suture the catheter down or use the snap-on flange provided in the kit. This will prevent migration of catheter further into vein.